

The smell of raw cedar and damp wool hits you before you even step into the workshop. It is a scent that demands you drop your shoulders and exhale. We are moving away from the frantic hum of digital notifications and stepping into the weight of physical objects. Crafting for slow living is not just a hobby; it is a neurological reset that happens when your hands engage with the resistance of a material. Think about the friction of a linen thread passing through beeswax or the specific density of wet clay under your palms. This is about the physics of intentionality. When we choose to spend six hours sanding a single curve of cherry wood, we are reclaiming our attention spans from the void. You are not just making a thing; you are calibrating your internal clock to the speed of growth and the steady pull of gravity. Every fiber and every grain has a story to tell if you are quiet enough to listen to the tactile feedback of your tools.
THE STUDIO KIT
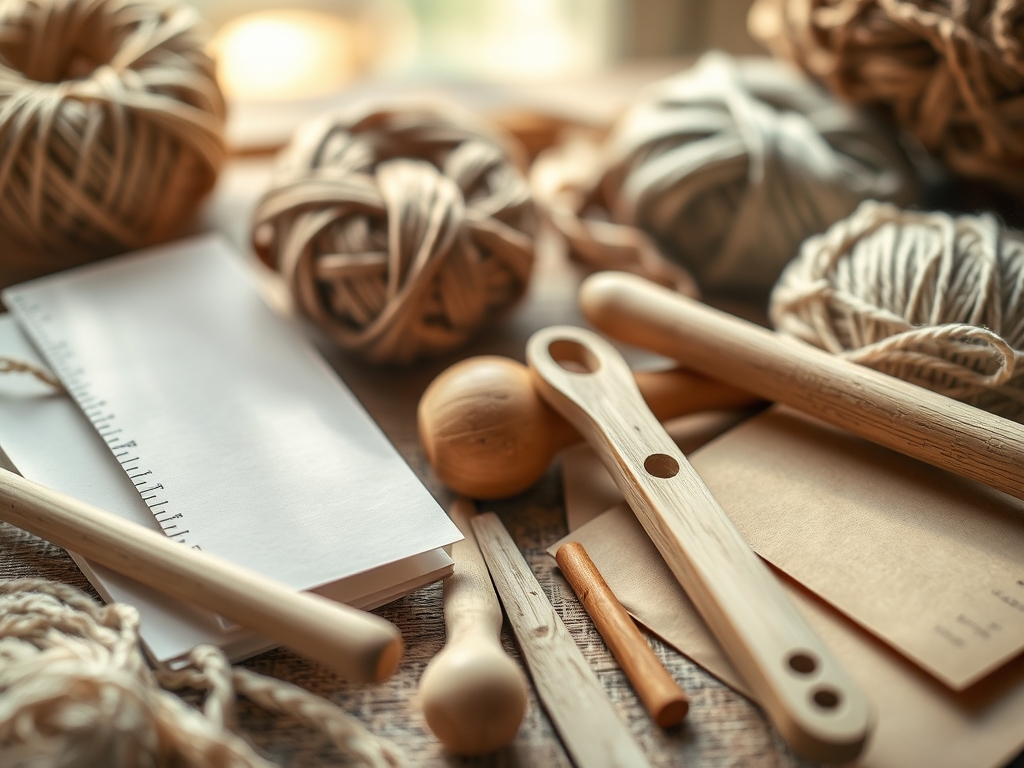
To master these six traditional crafts, your kit must prioritize high-quality mechanical interfaces over plastic shortcuts. For Green Woodworking, you need a high-carbon steel sloyd knife and a drawknife; the steel must hold a razor edge to slice through the cellular structure of the wood without crushing the fibers. For Natural Dyeing, a heavy-gauge copper or stainless steel pot is essential to prevent metallic reactions that might shift the pH of your dye bath. Hand-Stitched Leatherwork requires a diamond-tipped awl and a pair of wing dividers for precise geometric marking. For Sloyd-style Spoon Carving, keep a specialized hook knife nearby to hollow out the bowl. Botanical Printing requires a heavy-rolling pin or a manual cold-press to ensure the plant tannins transfer to the cellulose fibers of the paper. Finally, for Hand-Spinning, a drop spindle with a balanced center of gravity is your primary engine.
Material Substitutions: If you cannot source fresh-cut birch for carving, kiln-dried basswood is a functional alternative, though it lacks the moisture-rich "butter" feel of green wood. For natural dyes, if indigo is too complex, onion skins offer a high-tannin entry point that requires no chemical mordant to bond with protein fibers like wool.
THE TEMPO
The "Maker's Rhythm" is a state of flow where the passage of time is measured in repetitions rather than minutes. In green woodworking, the tempo is dictated by the moisture content of the wood; you must work quickly enough to shape the piece before it seasons, yet slowly enough to respect the grain direction. Hand-stitching leather follows a rhythmic "punch-pull-tighten" cadence that mimics a heartbeat. You should expect the "Seasoning Phase" of any project to take at least forty-eight hours, while the "Active Construction" usually spans three to five sessions of two hours each. This intentional pacing prevents cognitive fatigue and ensures that your tensile strength remains consistent across the entire piece. If you rush the drying of a ceramic bowl or a dyed textile, you risk structural failure or uneven pigment saturation.
THE CORE METHOD
1. Green Woodworking: The Spoon
Begin by selecting a "crook" or a branch where the grain follows a natural curve. Use your sloyd knife to remove the bark, working away from your body with long, peeling strokes. Mastery Tip: Always observe the radial symmetry of the wood. Carving against the grain causes "tear-out," where the fibers rip rather than slice; always carve "downhill" from the highest point of the curve to the lowest to maintain a smooth surface.
2. Natural Dyeing: The Silk Scarf
Scour your fabric in hot water to remove any industrial oils that might block absorption. Simmer your botanical materials (like walnut husks) to extract the pigment, then submerge the fabric. Mastery Tip: This process relies on capillary action. If the fabric is bunched, the dye cannot migrate evenly through the fibers. Use a "slow-simmer" technique to ensure the heat opens the fiber scales, allowing the pigment molecules to lodge deeply within the protein structure.
3. Leathercraft: The Minimalist Wallet
Mark your stitch line using wing dividers set to a three-millimeter offset. Punch your holes with an awl, ensuring the tool stays perfectly perpendicular to the leather surface. Mastery Tip: Use the saddle stitch method with two needles. By crossing the threads inside each hole, you create a mechanical lock; even if one thread breaks, the structural integrity of the seam remains intact due to the friction of the waxed thread.
4. Hand-Spinning: The Wool Yarn
Attach a "leader" thread to your spindle and begin drafting your wool roving. Flick the spindle to create twist. Mastery Tip: This is a lesson in tensile force. If you add too much twist, the yarn will kink into "snarls"; too little, and the fibers will slide past each other and snap. Find the "equilibrium point" where the twist holds the fibers together without compromising the elasticity of the wool.
5. Botanical Printing: The Paper Journal
Layer fresh leaves between sheets of high-cotton-content paper. Bind them tightly between two wooden boards and steam them for ninety minutes. Mastery Tip: This relies on tannin-iron reactions. If you dip your leaves in a weak ferrous sulfate solution before pressing, the iron acts as a catalyst, darkening the plant's natural acids into deep, permanent blacks and purples on the paper.
6. Basketry: The Willow Tray
Soak your willow rods until they are pliable enough to wrap around your finger without snapping. Start with a "twining" weave around a central base. Mastery Tip: Pay attention to the taper of the rod. Always overlap the thick "butt" end of a new rod with the thin "tip" end of the previous one to maintain a uniform thickness and prevent weak spots in the structural walls.
THE TECHNICAL LEDGER
Maintenance & Longevity: To keep your wooden tools from cracking, rub them with food-grade mineral oil once a month. Leather items should be treated with neatsfoot oil to keep the fibers supple. For textiles, always wash in pH-neutral soap to prevent the natural dyes from "bleeding" or shifting color.
Material Variations: For a premium experience, source "Grade A" vegetable-tanned leather, which develops a rich patina over time. For sustainable crafting, use "windfall" wood—branches naturally shed by trees—which ensures your practice does not harm the local ecosystem.
The Correction:
- Wood Checking: If your carving starts to crack, it is drying too fast. Seal the end grain with wax to slow the evaporation.
- Dye Spotting: If your dye is splotchy, you likely skipped the "scouring" phase. Re-wash the fabric and re-dye to even out the saturation.
- Loose Stitches: If your leather stitches look sloppy, your awl might be dull. Sharpen the tip on a leather strop with jeweler's rouge to ensure clean, effortless entry.
Studio Organization: Store your wood in a cool, humid environment to prevent brittleness. Keep your leather flat in a dark drawer to avoid UV degradation and "sun-tanning" the hide prematurely. Textiles should be stored in acid-free tissue paper to preserve the vibrancy of natural pigments.
THE FINAL REVEAL
Look at that! You have successfully traded mindless scrolling for the rhythmic click of tools and the scent of the earth. There is a profound energy in a finished piece that carries the marks of your hands; it has a weight and a soul that no factory machine can replicate. Your spoon is perfectly balanced for your grip; your leather wallet smells of tannins and hard work; your dyed scarf glows with the colors of the forest. This is the heart of crafting for slow living. You have built something that will last for decades, and in the process, you have built a more focused, intentional version of yourself.
STUDIO QUESTIONS
What is the best wood for a beginning carver?
Basswood is the gold standard for beginners because it has a very fine, straight grain and low density. This makes it incredibly easy to slice with a sloyd knife, allowing you to focus on technique without fighting the material.
Why does my natural dye wash out so easily?
You likely missed the "mordanting" step. A mordant, like alum, acts as a chemical bridge that permanently bonds the dye molecules to the fabric fibers. Without it, the pigment simply sits on the surface and washes away during rinsing.
How do I stop my leather thread from tangling?
Always pull your thread through a block of pure beeswax before you start stitching. The wax coats the fibers, reducing the friction and static electricity that cause loops and knots, while also protecting the thread from moisture and rot.
Can I use dry wood for green woodworking projects?
You can, but it requires much more physical force and sharper tools. Dry wood has a higher "shear strength," meaning the fibers are locked tight. You will need to use a mallet and chisel rather than just a carving knife.

