
Push your sleeves up and get ready to feel the grit between your knuckles because we are diving into the visceral world of mud. There is a specific, primal satisfaction in the resistance of a fresh wedge of stoneware. When you engage in daily clay handbuilding, you are not just making a cup; you are negotiating with a living silicate structure. The moisture content dictates every move you make. If the clay is too wet, the tensile strength collapses under its own weight. If it is too dry, the particulate bonds shatter, leaving you with micro-fractures that haunt your firing process. We are going to master the pinch pot today, but not like a grade schooler. We are going to treat this like an engineering project. Grab your favorite high-fire stoneware or a smooth porcelain body. We are looking for that perfect "leather hard" transition where the material is still malleable but holds its structural integrity. This is where the magic happens. We are going to use the heat of our palms to drive out excess moisture while our fingertips map the wall thickness with the precision of a digital caliper.
THE STUDIO KIT
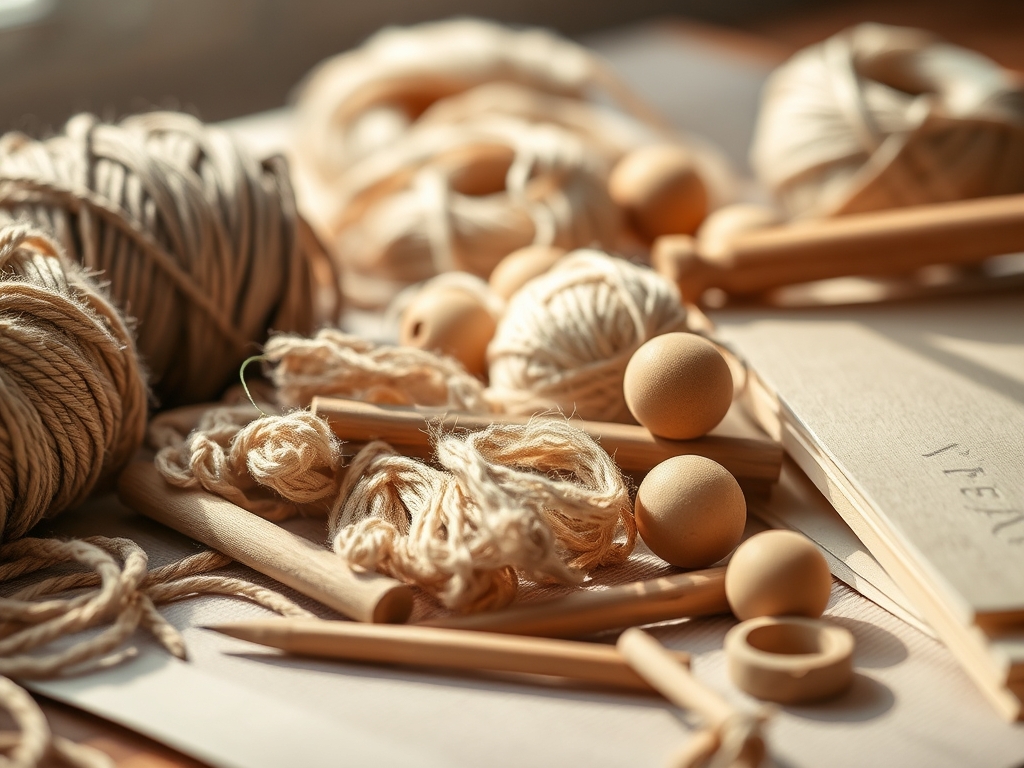
To master daily clay handbuilding, your toolkit needs to be an extension of your nervous system. You cannot rely on blunt force; you need instruments that respect the porous nature of the medium. Start with a high-quality serrated rib for scoring and a flexible steel kidney for burnishing the surface. You will also need a needle tool for checking floor thickness and a modeling tool for internal compression. If you are working at a professional level, keep a pair of calipers nearby to ensure your rim diameters stay consistent across a set.
Material Substitutions: If you lack a professional rib, a credit card or a stiff silicone spatula works wonders for surface compression. Instead of a wire cutter, a high-gauge fishing line tied to two washers provides a clean, shear cut through the clay body without dragging the internal grain. For texture, look toward the natural world. Dried seed pods or coarse linen scraps offer a tactile relief that synthetic stamps simply cannot replicate. Always keep a damp chamois cloth handy; it is the secret weapon for creating a rim so smooth it feels like polished stone.
THE TEMPO
The rhythm of the studio is dictated by the evaporation rate. You cannot rush a pinch pot. If you force the shape while the clay is in a "slump" state, you will introduce structural fatigue. The first ten minutes are the "Engagement Phase," where you center the mass and establish the floor. The next twenty minutes are the "Expansion Phase," where you slowly migrate the clay upward and outward. Finally, you enter the "Refinement Phase," which can last anywhere from thirty minutes to an hour depending on the complexity of your surface texture.
This is the Maker's Rhythm: a cycle of action and observation. You must allow the piece to rest. Professional potters often work on three or four pieces simultaneously. This allows the first pot to lose a small percentage of its water weight, firming up enough to support the weight of the rim as you finish the second. This prevents the "pancake effect" where the base sags under the cumulative pressure of the walls.
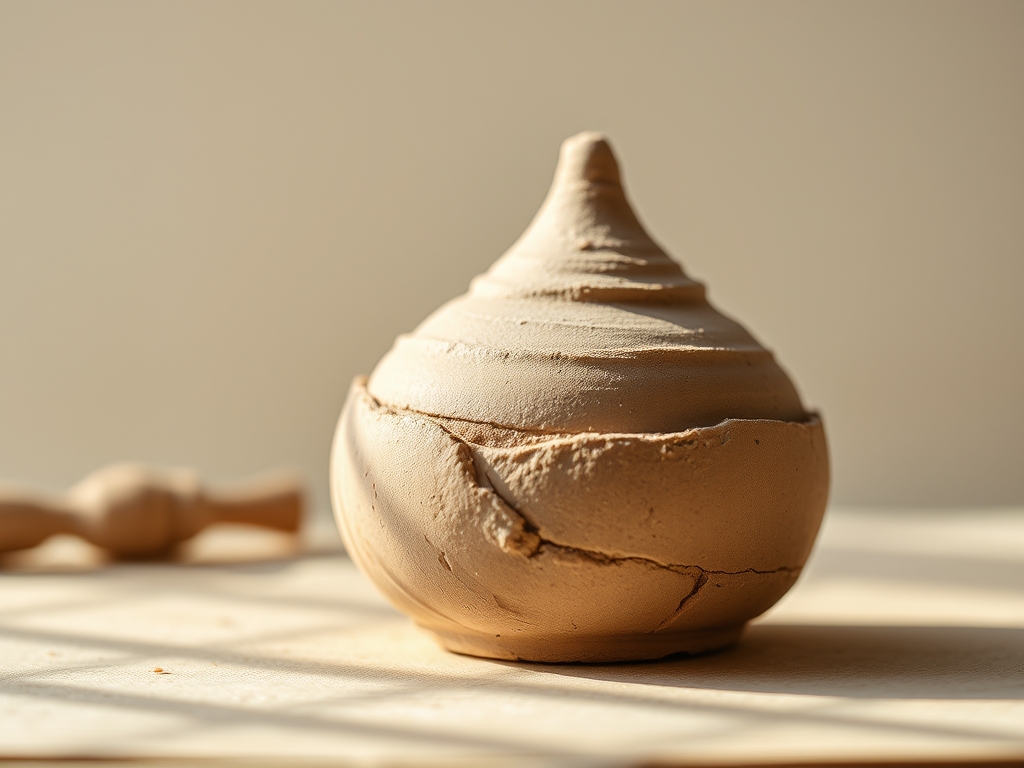
THE CORE METHOD
1. The Centered Compression
Start with a sphere of clay roughly the size of a lemon. Hold it in your non-dominant hand and use the thumb of your dominant hand to press into the center. Do not go all the way through; leave exactly half an inch at the bottom. Mastery Tip: Use your needle tool to poke through the floor to check the depth. This ensures structural integrity and prevents the base from cracking during the shrinkage phase of the kiln firing.
2. The Spiral Pinch
Starting at the base, use a rhythmic pinching motion between your thumb and fingers. Rotate the ball slightly with every pinch. Move in a slow, upward spiral toward the rim. Mastery Tip: This technique utilizes capillary action within the clay body. By moving in a spiral, you are aligning the platelet particles of the clay, which significantly increases the pot's resistance to warping.
3. Interior Burnishing
Once you have achieved your desired height, take a wooden modeling tool and smooth the interior floor. You want to eliminate any sharp angles where the wall meets the base. Mastery Tip: Compressing the interior floor prevents "S-cracks." By applying downward pressure, you are forcing the clay grains to interlock, creating a dense, reinforced foundation that can withstand the thermal shock of the kiln.
4. Rim Consolidation
The rim is the most vulnerable part of your pot. Use a damp chamois or a piece of soft plastic to wrap over the top edge. Gently compress the clay downward as you rotate the pot. Mastery Tip: This creates a "beaded" edge. A compressed rim is less likely to chip and provides a better ergonomic experience for the user. It also prevents the rim from drying faster than the base, which causes uneven tension.
5. Exterior Ribbing
Take your flexible steel rib and sweep it upward along the exterior wall. This removes the finger marks and creates a "canvas" for your texture drills. Mastery Tip: This action performs surface tension management. By smoothing the exterior, you are sealing the "pores" of the clay, which slows down the drying process and allows for more intricate carving later.
6. The Paddle and Anvil
If your pot has become slightly asymmetrical, use a flat wooden paddle on the outside while holding your hand (the anvil) on the inside. Gently tap the walls into the desired silhouette. Mastery Tip: This is a form of cold forging for clay. It increases the density of the walls without adding extra thickness, resulting in a piece that feels lighter than it looks.
7. The Incised Texture Drill
Using a sharp awl or a fine-point stylus, carve a series of geometric lines into the leather-hard surface. Focus on the "grain" of the pot. Mastery Tip: Carving removes a small amount of mass, which changes the thermal mass of the piece. Ensure your cuts are of uniform depth to prevent the wall from bowing inward during the high-heat expansion of the firing.
8. The Staccato Stamp
Take a textured object; like a heavy bolt or a piece of coral; and press it firmly into the clay. Support the wall from the inside to prevent collapse. Mastery Tip: This creates a displacement of volume. The clay has to go somewhere, so it will bulge slightly around the stamp. This adds a "weighted" visual aesthetic that makes the pot feel grounded and intentional.
9. The Slip Trailing Finish
Mix a small amount of your clay body with water until it reaches the consistency of heavy cream. Use a bulb syringe to "draw" raised lines over your pinched form. Mastery Tip: This adds a three-dimensional relief. Because the slip has a higher water content than the pot, it will shrink more. Applying it at the correct leather-hard stage ensures the two different moisture levels bond without peeling.
THE TECHNICAL LEDGER
Maintenance & Longevity: Your tools are your livelihood. Clean your ribs and needles immediately after use to prevent rust. If you use wooden tools, occasionally rub them with a food-safe mineral oil to prevent the wood from becoming hygroscopic and sucking moisture out of your clay.
Material Variations:
- Sustainable: Reclaim your scraps by slaking them down in a bucket of water and re-wedging them. This "recycled" clay often has better plasticity than fresh bags.
- Premium: Add a small amount of paper pulp to your clay (paperclay) to increase the green strength, allowing you to pinch walls that are paper-thin.
The Correction:
- The Slump: If the pot sags, use a hair dryer on a low setting for sixty seconds to flash-dry the base.
- The Crack: If a crack appears, do not just add water. Dig out the crack into a "V" shape and fill it with "vinegar slip" (clay mixed with white vinegar) to break the surface tension and create a chemical bond.
- The Thin Spot: If a wall gets too thin, "patch" it from the inside with a small flattened coil, then rib it until the seam disappears.
Studio Organization: Store your in-progress pinch pots on a wooden board (bat) and cover them with a heavy-duty plastic bag. To slow the drying even further, place a damp sponge inside the bag but not touching the clay. This creates a micro-climate that keeps the piece at a consistent "workable" state for days.
THE FINAL REVEAL
Look at that! You have taken a chaotic lump of earth and organized it into a vessel of high-density beauty. The texture is crisp; the rim is compressed; and the base is structurally sound. There is a specific "ring" to a well-pinched pot even before it hits the kiln. It feels balanced in the hand because you have meticulously managed the mass distribution. This is the heart of daily clay handbuilding. It is not just about the finished product; it is about the technical mastery of the material. Your hands now know the language of the clay.
STUDIO QUESTIONS
What is the best clay for pinching?
A clay body with "grog" (pre-fired clay granules) is best. It provides a structural skeleton that prevents the pot from collapsing during the pinching process and reduces the overall shrinkage rate during firing.
How do I prevent my pinch pot from cracking?
Ensure the base is compressed thoroughly and the walls are of uniform thickness. Uneven walls dry at different rates, creating internal stress that leads to cracks. Always dry your finished pieces slowly under plastic.
Can I fix a pot that is too dry?
You can spray it with a fine mist of water and wrap it in a damp towel for several hours. This process, known as "re-hydrating," allows the moisture to penetrate the clay platelets without causing the piece to dissolve.
Why does my rim always get wavy?
Wavy rims occur when you apply too much outward pressure without enough upward movement. Focus on "lifting" the clay rather than just squeezing it. Keep your rim compressed with a chamois to maintain a circular geometric profile.

